

Table of Contents
- What You Need Before Installing Bluetooth Communication in a Motorcycle Helmet
- Motorcycle Helmets With Built in Bluetooth vs. Add-On Systems
- Step 1: Remove the Helmet Liner and Prepare the Shell
- Step 2: Motorcycle Helmet Speaker Placement in the Ear Pockets
- Step 3: Mount the Microphone and Control Unit
- Step 4: Cable Routing and Hiding Wires Inside the Helmet
- Step 5: How to Pair a Motorcycle Bluetooth Headset and Test Audio
- Common Installation Mistakes and Post-Installation Maintenance
- Frequently Asked Questions
Last Updated: September 25, 2026
What You Need Before Installing Bluetooth Communication in a Motorcycle Helmet
Installing bluetooth communication in a motorcycle helmet takes about 30 minutes and basic tools. This guide covers every step, from pulling the liner to pairing your phone.
Gather these first:
- Your Bluetooth headset and its full installation kit
- A clean, well-lit work surface
- A small Phillips screwdriver
- Isopropyl alcohol wipes
- A microfiber cloth
- Your helmet, with the visor removed
Motorcycle Helmets With Built in Bluetooth vs. Add-On Systems
Motorcycle helmets with built in bluetooth come in two forms: factory-integrated systems and add-on kits.
| Feature | Factory-Integrated | Add-On Kit |
|---|---|---|
| Fit | Helmet-specific recesses | Universal brackets |
| Exterior profile | Nearly invisible | Visible module |
| Installation time | Minutes | 20-40 minutes |
| Helmet compatibility | One or two models | Most helmets |
| Cable management | Pre-routed | You route it |
Factory-Integrated Options From Sena and Cardo
Sena and Cardo both build systems that drop into specific helmets with no exposed hardware.
Step 1: Remove the Helmet Liner and Prepare the Shell
Start by pulling the helmet liner. Most modern helmets use snaps, clips, or Velcro at the neck roll and crown. Work slowly and note where each piece attaches.
Step 2: Motorcycle Helmet Speaker Placement in the Ear Pockets
Correct motorcycle helmet speaker placement puts each speaker directly over your ear canal. If it sits forward or behind your ear, volume drops and bass disappears.
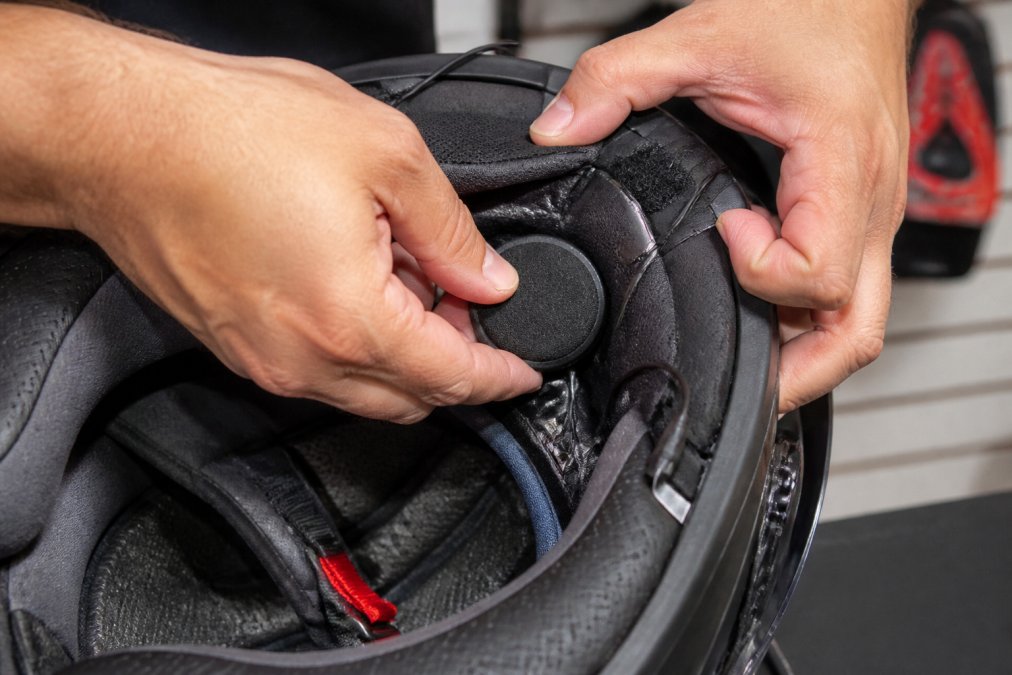
Here is the sequence:
- Sit the helmet on your head without the liner.
- Note where your ear canal sits inside the shell.
- Mark that spot with a small piece of tape.
- Peel the backing off the Velcro pad and press it into the ear pocket.
- Attach the speaker to the pad.
Using Velcro Pads and Spacers for Comfort
Velcro pads let you reposition speakers without replacing adhesive, your first placement is rarely your best.
Step 3: Mount the Microphone and Control Unit
Microphone choice depends on helmet type. Full-face helmets take a wired microphone tucked behind the chin bar; modular and open-face helmets need a boom microphone that reaches your mouth.
For the control unit, you have two mounting choices:
- Clamp mount slides between the shell and the liner. No adhesive, and you can move it later.
- Adhesive mount sticks directly to the shell. Cleaner look, but permanent.
Boom vs. Wired Microphone by Helmet Type
| Helmet Type | Microphone | Why |
|---|---|---|
| Full-face | Wired | Tucks behind chin bar, no wind exposure |
| Modular | Boom | Reaches your mouth when the chin bar is up |
| Open-face | Boom | No chin bar to mount a wired mic |
| Half helmet | Boom | Same reason as open-face |
Route the mic cable along the same path as the speaker cables so nothing dangles.
Step 4: Cable Routing and Hiding Wires Inside the Helmet
Cable routing separates a clean install from a messy one. No cable should touch your skin, cross the chin strap path, or flex at a sharp angle.
Where the Channels Actually Are
Helmets are not hollow. Between the comfort liner and the EPS foam is a narrow gap, and on most modern helmets from Shoei, HJC, Arai, Scorpion, and AGV that gap runs in predictable places:
- Along the crown, front to back, under the top liner snaps
- Down each side, from the ear pocket toward the neck roll
- Around the neck roll, where the liner meets the shell edge
Managing Excess Cable Length
Every kit ships with more cable than any helmet needs, and that extra length is the top cause of pinched wires and pressure points:
SENA SRL3 COMMUNICATION SYST →
- Route first, then trim slack. Do not cut anything. Run the full cable along its intended path with the liner out.
- Coil the excess into a flat figure-eight, not a tight spiral. A tight coil creates a stress point that breaks the conductor over time.
- Tuck the coil into the rear neck-roll cavity, behind the liner, where nothing presses on it, the same spot factory-integrated systems use for their battery.
- Secure the coil with gaffer tape or the Velcro tie from the kit. Do not use electrical tape directly on the cable jacket; the adhesive leaves residue that attracts grit.
- Leave a small service loop, about an inch of slack, at each connector so the cable is not under tension when the liner is reinstalled.
Routing by Helmet Type
The path changes with the shell:
| Helmet Type | Routing Note |
|---|---|
| Full-face | Run the mic cable above the chin bar hinge, not through the hinge gap, so the visor mechanism cannot pinch it |
| Modular | Leave extra slack on the mic cable so the chin bar can flip up without pulling the wire |
| Open-face | Route speaker cables down and back along the cheek pad edge; there is usually no crown channel to use |
| Half helmet | Keep cables tight to the shell edge; there is minimal liner to hide them behind |
The Flex Test
Before you reinstall the liner:
- Put the helmet on with the liner still out.
- Tighten the chin strap as you would for a ride.
- Turn your head fully left, then fully right.
- Tilt your chin down toward your chest, then look up.
Any cable that presses, tugs, or shifts during those movements will do the same at highway speed, only worse. Reroute now, once the liner is back in, you will not want to pull it again.
Step 5: How to Pair a Motorcycle Bluetooth Headset and Test Audio
Learning how to pair a motorcycle bluetooth headset takes about a minute. Put the headset in pairing mode, then select it from your phone's Bluetooth menu.
- Power on the headset.
- Hold the designated button until the LED flashes in a pairing pattern.
- Open Bluetooth settings on your phone.
- Select the headset from the list of available devices.
- Confirm the connection.
Test audio in three stages: parked, at low speed, and at highway speed. Problems that only appear at speed usually trace back to microphone position, not the headset.
Common Installation Mistakes and Post-Installation Maintenance
Most install guides stop the moment the headset powers on, that is where the real problems start. This section covers mistakes that show up weeks later, plus maintenance that keeps the electronics working as long as the helmet does.
Mistakes That Show Up After the First Ride
The first ride exposes problems a parked test never will:
- Speakers that sounded fine parked but go thin at speed. Wind noise masks low frequencies, so a speaker a few millimeters off your ear canal only becomes obvious above 40 mph. Add one foam spacer per side before touching any EQ settings.
- Cables that were quiet in the driveway but press against your temple on the highway. A cable routed over the EPS foam instead of behind it will not bother you standing still. Put the helmet on, tighten the chin strap, and turn your head fully left and right before calling the routing done.
- A control unit that snags your jacket collar. Clamp-mounted units on the lower-left shell edge are the usual culprit. Move the mount up and back along the shell curve so your collar slides under it.
- A microphone that clips on the first phone call. Boom mics set too close to the lips distort on plosives. Pull the tip back roughly a finger's width from your mouth.
- Adhesive pads that let go in summer heat. Pads applied over skin oils or sunscreen residue fail within weeks. Wipe the surface with an isopropyl alcohol pad and let it dry fully before pressing.
Helmet-Type Nuances Most Guides Skip
Installation problems cluster by helmet type, and the fix differs for each:
| Helmet Type | Most Common Post-Install Issue | Fix |
|---|---|---|
| Full-face | Wired mic cable pinched by the chin bar when the visor closes | Reroute the mic cable above the chin bar hinge, not through it |
| Modular | Boom mic hits the chin bar when flipped up | Shorten the boom arm or reposition the mic base higher on the shell |
| Open-face | Wind noise overwhelms the mic at highway speed | Add the foam windscreen most kits include; if none, a small piece of open-cell foam over the mic capsule helps |
| Half helmet | Speakers sit too far from the ears with no ear pockets | Use the thickest spacers in the kit and consider a headset with larger drivers |
Cleaning the Helmet Without Damaging the Electronics
You cannot toss a helmet with an installed headset into a sink of water. Follow this order:
- Power the headset off and, if the battery is removable, take it out.
- Pull the liner and cheek pads. Most modern liners are removable and hand-washable.
- Hand-wash the liner in cool water with a mild detergent. Never machine wash or tumble dry, heat shrinks the foam and warps the snaps.
- Wipe the speakers and microphone with a dry microfiber cloth. Do not use alcohol on the speaker mesh; it degrades the adhesive holding the driver in place.
- Wipe the shell with a damp cloth, keeping water away from the control unit, the mic boom base, and any exposed connector.
- Let everything air-dry completely before reassembly. Trapped moisture corrodes the speaker contacts.
Firmware and Battery Care
Check the manufacturer's app every few months. Sena and Cardo both push firmware updates that fix pairing dropouts and intercom handoff bugs, and an out-of-date unit is a common cause of 'it worked last season' complaints.
Safety and Compliance
External mounts, clamp or adhesive, sit on the outside of the shell. A small, low-profile mount is generally considered low-risk, but a bulky mount can affect how the helmet slides in a crash and can, in some interpretations, be treated as a modification.
Frequently Asked Questions
Can you add Bluetooth to any motorcycle helmet?
Most helmets can accept an add-on system, but fit varies. Full-face and modular helmets have ear pockets and space for a clamp or adhesive mount. Some helmets, like the Shoei Neotec 3, GT-Air 3, and J-Cruise 3, have dedicated recesses for integrated units such as the Sena SRL3. Check that your helmet has removable padding and enough room near the shell edge before buying a kit.
What is the best Bluetooth communicator for motorcycle helmets?
It depends on your helmet and riding style. For Shoei owners, the Sena SRL-EXT and SRL-MESH drop into compatible interiors with Harman Kardon audio. HJC riders can use the Cardo HJC 4X with JBL speakers and voice operation. Mesh systems suit group rides, while 4-way Bluetooth intercom works for smaller crews. Match the unit to your helmet model first, then to your riding needs.
Do I need special tools to install a motorcycle Bluetooth headset?
No specialty tools are required. Most installation kits include velcro pads, adhesive mounts, and a clamp bracket. You will want a clean workspace, a soft cloth, and possibly a small screwdriver for the liner snaps. Avoid metal tools near the shell interior to prevent scratches. Always follow the kit instructions for your specific helmet model.
How do I hide wires when installing a helmet communicator?
Route cables behind the helmet liner and along the existing channel where the cheek pads meet the shell. Tuck excess wire under the neck roll or behind the comfort liner. Use the velcro pads from the kit to secure speakers and keep wires flat. Avoid pinching cables between the shell and padding, which can damage them over time.


