

Table of Contents
- What You'll Need Before You Start
- Step 1: Mount the Headset and Run the Wiring
- Motorcycle Helmet Speaker Placement Guide
- Step 2: How to Pair Motorcycle Helmet Bluetooth to Phone
- Motorcycle Helmets With Built in Bluetooth vs. Add-On Systems
- Troubleshooting Motorcycle Bluetooth Connection Issues
- Common Bluetooth Setup Mistakes to Avoid
- Conclusion
- Frequently Asked Questions
Last Updated: September 17, 2026
What You'll Need Before You Start
Easy bluetooth setup for motorcycle helmets comes down to four things: a charged headset, the right mounting hardware, patience, and a correctly fitting helmet. Get those in order and the rest takes about 15 minutes.
Here is the short list before you touch the helmet:
- Your Bluetooth headset and all mounting hardware
- A USB charging cable and a power source
- Isopropyl alcohol wipes or a clean cloth
- A small Phillips screwdriver (for clamp mounts)
- Your phone, with Bluetooth turned on
One quick note on safety. The NHTSA motorcycle safety guidance is clear that anything you attach to a helmet must not weaken the shell or block your view. Never drill into a helmet shell. Every quality headset uses clamps or adhesive pads for exactly this reason.

Step 1: Mount the Headset and Run the Wiring
Mount the control unit outside the helmet first, then run the wires inside, this order keeps wiring from snagging while you work.
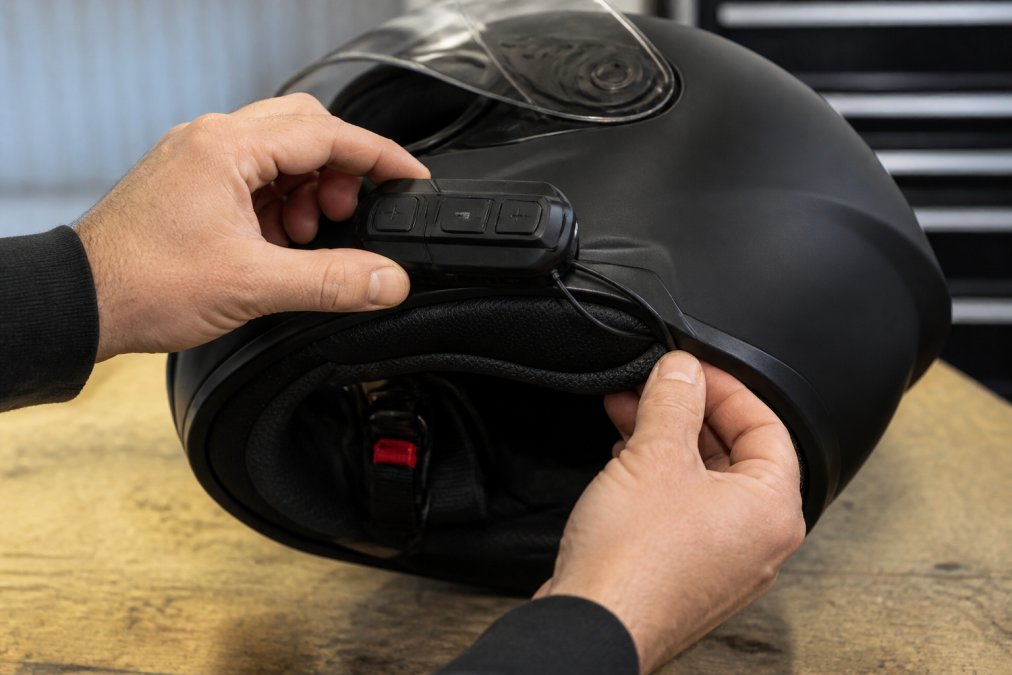
Most riders mount the main unit on the left, so controls sit under the non-throttle hand. Clean the surface with an alcohol wipe, let it dry, then press the adhesive pad or tighten the clamp. Give adhesive mounts a few minutes to set before pulling on the cable.
Next, tuck the speaker and microphone wires behind the liner, routing them along the existing seam so they sit flat against the shell.
Motorcycle Helmet Speaker Placement Guide
Correct speaker placement is the difference between thin, tinny audio and sound you can hear at highway speed. Speakers must sit directly over your ear canals, not above or behind them, and that looks different in each shell type. Here is how to get it right.
Full-face helmets
Full-face liners almost always have molded ear pockets, but depth varies. Full-face liners almost always have molded ear pockets, but depth varies. If you feel pressure, add a thin foam spacer, it moves the speaker outward and relieves the pinch without killing volume.
Modular helmets
The chin bar hinge is the complication. Route the microphone boom so it clears the hinge arc when the bar flips up, if it sits in the hinge path, the chin bar will crush it the first time you open the helmet. Tuck the boom along the cheek pad seam, leaving just enough slack for the mic to sit a finger's width from your mouth.
Open-face and half helmets
These shells usually have no ear pockets at all, so the speaker sits against the liner or your ear directly, where foam spacers and the kit's adhesive-backed speaker pads earn their keep. On a half helmet, the speaker often mounts to the strap or liner edge rather than the shell, since there is no shell surface next to the ear. Daytona Helmets Bluetooth Headset kits include hardware for exactly this, and the same unit fits full-face, modular, open-face, and half helmets without permanent changes.
Head shape matters too
Helmet fit is built around head shape, round, intermediate oval, or long oval. A long-oval rider in a round-fit liner will find the ear pockets sit forward of the ear canal, pushing the speaker off-axis and making audio sound distant on one side. If that is you, shift the speaker rearward in the pocket rather than adding foam.
The five-step check that works in any shell
- Put the helmet on and note where your ears sit inside the shell.
- Find the ear pockets, the recessed cutouts in the liner made for speakers.
- Seat each speaker flat inside its pocket, facing your ear.
- Check that the speaker does not press against your ear. Pressure causes pain on long rides.
- Reposition if the sound feels off-center or weak on one side.
Step 2: How to Pair Motorcycle Helmet Bluetooth to Phone
Pairing takes under a minute once the headset is charged and powered on. The button sequence varies by model, but the process is the same across brands.
Daytona Helmets Motorcycle Bluetooth →
Follow these steps:
- Charge the headset fully. A low battery can block pairing mode.
- Hold the power button until the LED flashes red and blue. That flashing means it is in pairing mode.
- Open your phone's Bluetooth settings and scan for devices.
- Tap the headset name when it appears.
- Enter the passcode if asked. Most units use 0000 or 1234.
- Wait for the confirmation tone or voice prompt.
Motorcycle Helmets With Built in Bluetooth vs. Add-On Systems
Motorcycle helmets with built in Bluetooth arrive ready to ride, but add-on systems give you more freedom. Neither is automatically better. It depends on how you ride and how often you change helmets.
| Feature | Built-In Bluetooth | Add-On System |
|---|---|---|
| Setup time | None, ready out of the box | About 15 minutes |
| Works across helmets | No, locked to one helmet | Yes, moves between helmets |
| Battery access | Fixed inside the helmet | Removable and replaceable |
| Firmware updates | Varies by brand | Usually supported |
| Best for | One-helmet riders | Riders with multiple helmets |
Troubleshooting Motorcycle Bluetooth Connection Issues
Troubleshooting motorcycle bluetooth connection issues starts with one question: is the problem the headset, the phone, or the pairing? Work through these fixes in order.
Common Bluetooth Setup Mistakes to Avoid
Most setup failures come from a handful of repeat mistakes. Avoid these and your first ride will be trouble-free.
- Skipping the full charge. A half-charged headset may not enter pairing mode.
- Mounting on the throttle side. Controls get awkward and unsafe to reach.
- Leaving wire slack near the ear. It rubs and buzzes at speed.
- Placing speakers off the ear canal. Audio sounds weak and distant. See the shell-specific fitment notes above.
- Pairing to too many devices. Old entries cause conflicts. Clear them out.
- Ignoring the waterproof rating. Check the rating before riding in heavy rain.
- Never updating firmware. Updates fix bugs and improve battery life.
The mistake almost nobody warns you about: state audio laws
This is the part most setup guides skip, and it is the one that can cost you a citation. In-helmet audio rules are set at the state level and vary widely: some states allow one earbud or a helmet speaker in one ear only, others permit helmet-mounted speakers in both ears but prohibit earbuds entirely, and a few restrict any audio device that covers or plugs the ear.
Safety mistakes that matter more than pairing
- Riding with a loose control unit. A unit that shifts can distract you at the worst moment. Recheck the mount before every long trip.
- Cranking volume to beat wind noise. If you have to max the volume to hear GPS prompts, the problem is speaker placement or EQ, not the volume setting. Loud audio masks traffic and emergency vehicles.
- Taking calls in heavy traffic. Hands-free is not the same as attention-free. Pull over for anything that needs real thought.
- Assuming the intercom replaces a head check. Mesh and Bluetooth intercom range drops fast in hills, trees, and city streets. Do not rely on a voice prompt to tell you a riding partner is beside you.
The three mistakes that cause the most trouble are a weak battery, a stale pairing entry, and a phone stored too far from the headset. The three that cause the most risk are a loose mount, maxed-out volume, and ignoring your state's headset law. Fix the first three before you assume the unit is faulty, and fix the last three before you ride.
Conclusion
Getting your helmet connected should not be the hard part of a ride. With the right headset and a clean install, you go from box to paired in about 15 minutes.
Frequently Asked Questions
How do I add Bluetooth to my motorcycle helmet?
Most riders add Bluetooth by installing a universal headset like the Daytona Helmets Motorcycle Bluetooth Headset, which fits full-face, modular, open-face, and half helmets without permanent modification. You clamp or adhere the control unit to the shell, tuck the speakers into the ear pockets, and position the microphone near your mouth. All required hardware is included, so no drilling or cutting is needed. Once mounted, you pair it with your phone through the Bluetooth menu and you're ready for hands-free calling, music, and GPS audio.
Do I need a special helmet to install a Bluetooth headset?
No special helmet is required. Universal systems are designed to work with virtually any helmet type, including full-face, modular, open-face, and half helmets. The main thing to check is whether your helmet has ear pockets deep enough for the speakers. Most modern helmets do. If your helmet lacks ear pockets, you can still mount speakers with adhesive pads, though the fit may be tighter. Helmets with built-in Bluetooth are an option if you prefer a factory-installed setup, but add-on systems offer more flexibility across multiple helmets.
How do I pair my Bluetooth headset to my phone?
Turn the headset on and hold the power button until the LED flashes red and blue, which means it's in pairing mode. Open your phone's Bluetooth settings, wait for the headset name to appear, and tap it. Most headsets confirm the connection with a voice prompt. If your phone doesn't find the headset, make sure it's within 3 feet and that no other device is already connected. Once paired, the headset reconnects automatically whenever both are on and in range.
What should I do if my Bluetooth keeps disconnecting?
Start by checking the battery level, since a low charge is the most common cause of dropouts. Next, clear old pairing records on both your phone and headset, then pair again from scratch. Interference from other Bluetooth devices nearby can also cause issues, so try pairing in a less crowded area. If problems persist, update your headset's firmware and your phone's operating system. Finally, confirm the headset is within the rated range and that no metal objects are blocking the signal between your phone and helmet.


