Your premium Shoei helmet is a precision-engineered piece of safety equipment, and a sloppy intercom installation can compromise both its integrity and your comfort. Many riders hesitate to start because they fear snapping fragile liner clips or ending up with painful pressure points against their ears. It is a valid concern. A Shoei is a significant investment that deserves a clean, professional integration rather than a mess of exposed wires.
We've designed this expert-led 2026 walkthrough to show you exactly how to install sena in shoei helmet for a seamless, factory-quality result. Whether you're fitting an SRL3 into a Neotec 3 or mounting a universal unit, this guide ensures you maintain your helmet's ECE 22.06 safety standards while achieving crystal clear audio. We'll walk through the internal cable routing, precise speaker placement for optimal performance, and the critical firmware updates needed to get you on the road with confidence.
Key Takeaways
- Identify the specific compatibility between integrated SRL systems and universal clamps to choose the right hardware for your Shoei model.
- Master the technical steps of how to install sena in shoei helmet while protecting fragile plastic clips and maintaining factory safety standards.
- Route internal wiring through pre-cut EPS channels to ensure a comfortable, pressure-free fit and a professional, wire-free appearance.
- Achieve peak performance by optimizing speaker placement and updating your device to the latest 2026 firmware via the Sena Motorcycles App.
Preparing Your Shoei Helmet for Sena Installation
Successful integration starts with a stable environment. Clear a flat table and cover it with a thick, soft towel or a dedicated helmet donut. This prevents the outer shell from sliding or sustaining scratches while you apply pressure to the interior components. You'll also need to verify your hardware compatibility immediately. The Sena SRL3 is designed specifically for the Shoei Neotec 3 and GT-Air 3, while the SRL-EXT fits the RF-1400. Using the wrong unit will result in a poor fit that compromises both safety and acoustics.
Gathering the right tools now prevents frustration later. You'll need a small flathead screwdriver for prying port covers, a microfiber cloth to protect the visor, and needle-nose pliers for seating delicate wiring. A premium Motorcycle helmet is a high-performance safety device, not just a shell, so treat every internal component with care. Ensure your Sena unit is fully charged and updated to the latest 2026 firmware. For example, the SRL3 should be on v1.4 and the SRL-MESH on v1.7. Performing these updates via the Sena Device Manager before you begin the physical process of how to install sena in shoei helmet ensures you won't have to disassemble everything if a software bug occurs.
To better understand this concept, watch this helpful video:
Identifying Your Shoei Helmet Architecture
Shoei helmets feature a unique internal layout. Models like the Neotec 2 and GT-Air 2 include dedicated plastic triangular ports on the sides and a battery compartment at the rear. These are specifically designed for the integrated SRL series. If you're using a universal clamp system on a model without these ports, you'll need to identify the gap between the outer shell and the EPS liner. Locate the removable ear pads and cheek pad snaps; these are your primary access points for routing the wiring harness. Take a moment to trace the pre-cut EPS channels designed to house your speakers and microphone cables without adding bulk.
Cleanliness and Component Safety
Protect your investment by maintaining high cleanliness standards. Wash your hands thoroughly to avoid transferring skin oils or garage grease to the high-end fabric of the Shoei liner. If you're working with the face shield attached, keep it covered with your microfiber cloth to prevent micro-abrasions. Never force a plastic clip or a battery housing during the process of how to install sena in shoei helmet. Shoei components are designed to click into place with precision. If a part isn't seating, double-check the alignment rather than applying more pressure, as snapped tabs can be difficult to replace.
Installing Integrated Sena SRL Systems into Shoei Helmets
Integrated systems like the Sena SRL series offer a factory-finished look that universal clamps cannot match. These units are custom-engineered for specific Shoei shells to ensure that the weight remains balanced and wind noise is minimized. When you understand how to install sena in shoei helmet via these integrated ports, you're taking advantage of Shoei's "Specific Accessory" design philosophy. This approach helps maintain the aerodynamic profile and aligns with NHTSA helmet safety guidelines by ensuring no external protrusions interfere with the helmet's performance during an impact.
Removing the Integrated Port Covers
Your Shoei helmet arrives with plastic covers protecting the communication ports. Use the plastic prying tool included with your Sena kit to gently pop these away from the shell. Start with the triangular side covers. Apply steady, even pressure to avoid snapping the internal tabs. Once removed, store these covers in your helmet box; you'll need them if you ever decide to remove the comms unit later. Inspect the exposed ports for any dust or manufacturing debris that could prevent a clean seal before you continue.
Seating the Battery and Main Modules
The battery pack is the heart of the system and sits in the rear cavity of the helmet. Align the pack with the curvature of the EPS liner and press firmly until you hear a distinct click. This click is critical. If the battery is loose, it can shift during rides and cause intermittent power failures. Next, slide the left and right control modules into their respective side ports. The left module typically contains the main control buttons. Ensure the antenna is tucked into its dedicated slot to maximize your mesh intercom range. If you're looking for a new lid to house your tech, you can browse our latest Shoei helmets for a guaranteed fit.
Plugging in the Internal Connectors
Wiring is where most mistakes happen. Shoei and Sena use color-coded connectors to simplify the process. Match the male and female ends carefully. These pins are extremely small and can bend if forced. If a connection feels stubborn, use your needle-nose pliers to grip the plastic housing rather than pulling on the wires themselves. Once connected, tuck the excess wire into the pre-cut channels in the EPS liner. This prevents the wires from being pinched when you snap the cheek pads back into place. Verify that the side buttons move freely and click audibly before you finalize the assembly.
Mounting Universal Sena Clamp Systems on Shoei Models
Universal mounts provide flexibility for riders who own multiple helmets or prefer to keep their communication hardware separate from the helmet shell. While integrated SRL units are sleek, universal clamp systems like the Sena 50S or 30K often offer different features, such as external antennas or larger control wheels. Learning how to install sena in shoei helmet with a clamp requires a different approach than the port-based systems. You must carefully navigate the interface between the outer shell and the internal EPS liner without causing permanent deformation to either component.
Shoei helmets are known for their thick, high-quality base gaskets designed to minimize wind noise. This thickness can make sliding a traditional clamp into place difficult. If the clamp doesn't slide in with moderate pressure, don't force it. Forcing the metal plate can score the EPS or put undue stress on the shell. In these cases, the adhesive mount is the superior choice. Before applying the 3M tape, clean the area with isopropyl alcohol to ensure a permanent bond that can withstand high speeds and varied weather conditions.
Choosing Between Clamp and Adhesive Mounts
First, assess the thickness of the helmet base rim. On older models like the RF-1200 or the Multitec, the clamp usually fits with a bit of patience. However, newer shells may have a tighter tolerance. Check for obstructions like the chin bar mechanism on modular models. If the clamp interferes with the movement of the chin bar, switch to the adhesive mount immediately. Always cross-reference your installation with the Federal Motor Vehicle Safety Standard No. 218. This standard defines the requirements for impact attenuation and penetration resistance. While mounting a comms unit is standard practice, ensuring the mount doesn't interfere with the helmet's ability to protect your head is paramount.
Positioning for Optimal Aerodynamics
Placement is a balance between reach and aerodynamics. Most riders prefer the unit on the left side for easy access with the non-throttle hand. However, you must account for the internal sun shield lever found on many Shoei models. Mount the Sena unit far enough back so the lever can move freely through its entire arc. A unit placed too far forward will also create significant wind buffeting at highway speeds. When tightening the hex bolts on a clamp mount, do so evenly. Alternate between the two screws to ensure the pressure is distributed across the plate. This prevents the unit from vibrating or shifting. Test your visor, chin bar, and sun shield multiple times before hitting the road to ensure total functionality. Mastering how to install sena in shoei helmet means prioritizing these small adjustments for a quiet, comfortable ride.
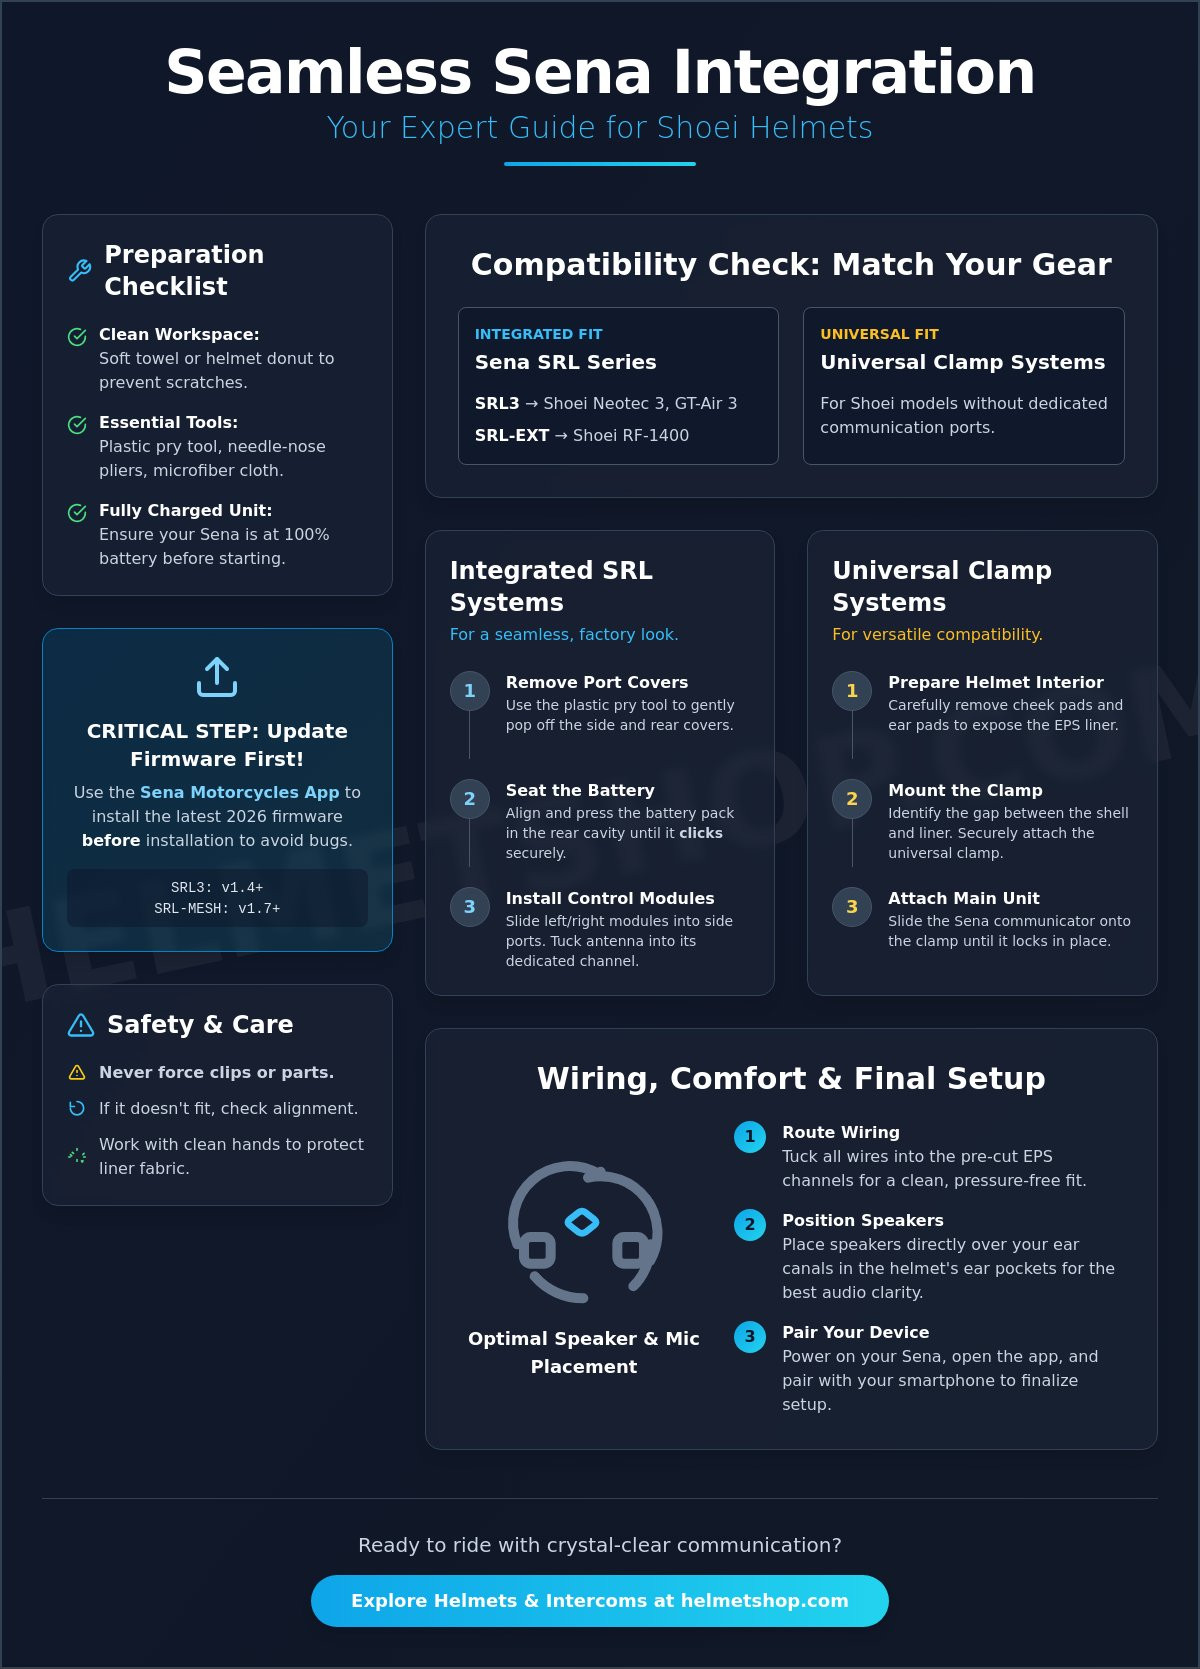
Routing Internal Wiring and Optimizing Speaker Comfort
The difference between a professional installation and a frustrating one often comes down to how you manage the internal cables. A Shoei helmet is a masterpiece of ergonomics, but adding an intercom system introduces extra bulk that can lead to "hot spots" or painful pressure points. When you're learning how to install sena in shoei helmet, your goal is to make the technology disappear. You want the audio to be clear without feeling any of the hardware against your head. This requires a methodical approach to routing wires through the multi-density EPS liner, which is specifically designed with recessed channels to accommodate these accessories.
Seating Speakers in Shoei Ear Pockets
Start by removing the Shoei ear pads. These pads are usually held in by simple plastic snaps. Once removed, you'll see the circular speaker cutouts. For the best audio performance, the speakers must be centered exactly over your ear canals. If they're slightly off, you'll lose the rich bass and clarity provided by premium Sena drivers like the Harman Kardon units found in the SRL3. If the pockets are too deep and the speakers feel too far away, use the adhesive spacers included in your Sena kit to move them closer to your ears. Ensure the velcro is pressed firmly into the lining so the speakers don't shift when you pull the helmet on. If you need a fresh set of motorcycle gloves to handle these delicate internal components, we have a wide selection of gear to complement your setup.
Tucking Wires Behind the EPS Liner
Shoei's multi-density EPS liners feature deep, pre-cut grooves designed to hide your wiring harness. Use a plastic prying tool or a dull card to guide the wires into these channels. Never use a metal screwdriver for this; you don't want to gouge the safety liner. A critical rule for a comfortable fit is to avoid crossing wires over each other. Overlapping cables create a bulge that will eventually press through the comfort liner and cause discomfort during long rides. Work from the back of the helmet toward the front, securing the excess wire behind the cheek pad area. Double-check that no cables are obstructing the ventilation ports or the movement of the internal sun shield mechanism.
Finally, choose the correct microphone for your helmet type. If you're working with a modular model like the Neotec 3, the boom microphone is your only option. Ensure the boom arm is routed so it doesn't get pinched when the chin bar is closed. For full-face models like the RF-1400, the small wired microphone is much more discreet. Attach it directly to the chin bar's internal padding using the provided adhesive. Once everything is tucked away, re-install the comfort liner and cheek pads. If you've followed these steps on how to install sena in shoei helmet correctly, the interior should look exactly as it did when it came out of the box.
Final Setup: Firmware Updates and Smartphone Pairing
Completing the physical steps of how to install sena in shoei helmet is a major milestone, but the system isn't road-ready until the software is optimized. Modern communication units rely on precise digital protocols to maintain stable connections, especially when using Mesh 2.0 technology. A clean installation deserves a high-performance configuration. This final phase ensures your audio levels are balanced, your voice commands are responsive, and your mesh intercom remains stable during group rides. Skip these steps, and you risk dealing with dropped connections or outdated features that hinder your riding experience.
Updating Firmware via Sena Device Manager
Before you pair your phone, connect the Sena unit to your PC or Mac using the original USB-C cable. Download the Sena Device Manager and check for the latest firmware. As of June 2026, the SRL3 requires v1.4 and the SRL-MESH requires v1.7 to ensure full compatibility with the latest smartphone operating systems and Mesh 2.0 stability. These updates often include critical bug fixes for audio clipping and battery management. Keep the device connected throughout the entire process; a disconnected cable during a firmware flash can corrupt the unit's internal software. Once the update is complete, your hardware is officially synchronized with the latest industry standards.
Pairing Your Device to a Smartphone
Download the Sena Motorcycles App, which is currently at v3.4 for iOS and v3.3 for Android. If your Sena unit was previously used or tested, perform a factory reset first to clear any old pairing data. To enter pairing mode, hold the center button for 10 seconds until the LED flashes red and blue. Search for the device in your phone's Bluetooth settings and select your model. Once connected, the app allows you to configure speed dials and fine-tune your intercom settings. This is also the time to test the "Hey Sena" voice commands. These hands-free triggers are essential for adjusting volume or checking battery status without taking your hands off the bars.
Troubleshooting Motorcycle TFT Displays
A common gap in many guides is how to handle modern motorcycle TFT dashboards. If your bike has an integrated display like those found on BMW, KTM, or Harley-Davidson models, the pairing order is vital. You should typically pair your smartphone to the bike's TFT first, and then pair your Sena unit to the bike as a "Phone" or "Mobile Phone" connection. This allows the motorcycle to act as the central hub for navigation and music. If you pair the phone directly to the helmet and the bike simultaneously, you'll often experience audio stuttering or lost commands. Testing these connections in your driveway is much safer than troubleshooting at 60 mph. Once the audio is crisp and the microphone picks up your voice clearly, the process of how to install sena in shoei helmet is officially complete. You're ready to enjoy the ride with professional-grade communication.
Ready for the Open Road
You've now mastered the technical nuances of how to install sena in shoei helmet. By prioritizing clean wire routing and precise speaker alignment, you've ensured your premium equipment delivers peak performance without compromising safety or comfort. A successful installation protects the integrity of your helmet while providing the crystal clear audio you expect from a high-end communication system. Remember that keeping your firmware updated is the final step in maintaining a stable, reliable connection for years to come.
As an authorized Shoei and Sena retailer, we're dedicated to helping you get the most out of your gear. We provide expert technical support for all communication systems and offer nationwide shipping on premium riding equipment to keep you moving. Explore our full range of Shoei helmets and Sena headsets to find the perfect combination for your next adventure. Your journey deserves the best technology; enjoy the ride with confidence and clarity.
Frequently Asked Questions
Does installing a Sena unit void my Shoei helmet warranty?
Installing a Sena unit does not void your Shoei warranty provided you don't drill holes or permanently alter the shell or EPS liner. Shoei specifically engineers their helmets with internal ports to accommodate integrated systems without compromising structural integrity. If you are concerned about how to install sena in shoei helmet safely, using the integrated SRL series ensures you are working within the manufacturer's design parameters.
Which Sena model is specifically designed for the Shoei Neotec 2 and GT-Air 2?
The Sena SRL-MESH and SRL2 are the dedicated models designed for the Shoei Neotec 2 and GT-Air 2 helmets. These units fit into the specific triangular ports and rear battery cavity built into the helmet shell for a flush, aerodynamic finish. While newer 2026 models like the Neotec 3 use the SRL3, owners of the Neotec 2 should choose the SRL-MESH to access Mesh 2.0 capabilities.
How do I charge the integrated Sena SRL system without removing it?
You charge the integrated Sena SRL system by plugging a USB-C cable directly into the port located on the underside of the control module. There is no need to disassemble the helmet or remove the battery pack for routine charging. Most riders find it most efficient to place the helmet on a stable surface near a wall outlet after a ride to ensure the unit is ready for the next trip.
Can I install a Sena 50S on a Shoei helmet with a thick base rim?
You can install a Sena 50S on a Shoei helmet, but the thick base gasket often makes the standard clamp mount difficult to slide into place. If the clamp feels like it is stretching the outer shell or putting undue pressure on the EPS liner, use the adhesive mounting plate instead. This provides a secure, vibration-free hold without risking damage to the helmet's weather seal or structural layers.
My Sena speakers are hurting my ears in my Shoei helmet; how do I fix this?
Speaker pain is usually caused by misaligned hardware or speakers that are sitting too far out of the recessed ear pockets. Remove any adhesive spacers to increase the pocket depth and ensure the speakers are centered exactly over your ear canals. Even a slight offset can cause the speaker edge to press uncomfortably against your ear cartilage during extended periods of riding.
How do I update the firmware on a Shoei-integrated Sena system?
The most reliable way to update your firmware is by connecting the headset to a computer and using the Sena Device Manager software. This ensures a stable connection for critical 2026 updates like v1.4 for the SRL3. You can also use the Sena Motorcycles App for over-the-air updates, provided your headset has a strong Wi-Fi connection and sufficient battery life to complete the process.
Where is the best place to put the microphone in a Shoei modular helmet?
The ideal location for the microphone in a modular Shoei is on the left side of the inner chin bar using the boom microphone attachment. Position the microphone head directly in front of your mouth without letting it touch your lips. This placement allows the modular chin bar to open and close freely without pinching the delicate wiring or shifting the microphone out of its optimal position.
Can I pair my Sena-Shoei setup with a Cardo headset?
You can pair your Sena-Shoei setup with a Cardo headset using the Universal Intercom pairing mode or the Open Bluetooth Intercom (OBI) protocol. While Mesh networks remain brand-specific, these Bluetooth standards allow cross-brand communication. Understanding how to install sena in shoei helmet and utilizing these pairing protocols ensures you can stay connected with your entire riding group, regardless of their preferred hardware brand.


